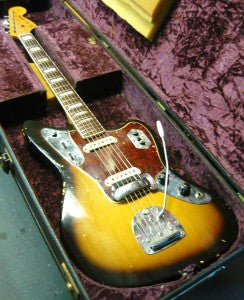
1968 Fender Jaguar re-fret and set up
Share
I've said it many times that I don't do re-frets lightly but this one really needed it. I also don't believe in having an instrument (or amp) that can't be used or sounds terrible but the owner would rather keep it all original. A re-fret or a cap job in an amp is an essential service that needs to be done eventually if you want to keep using your gear.
While I'm not a huge fan of block inlays and binding, especially on Fenders, I do have a soft spot for these on Jags. All that chrome and the great shape tends to set off those features nicely although I still prefer the bound and dot "transition" necks more.
This really needed a re-fret to play most of the neck cleanly and being a late 60's Fender Jaguar, it was a little bit more involved than an early to mid 60's one without blocks and binding.
These are still a little less work than Gibsons with blocks and binding because of the way Fender run their frets over the binding rather then the "nub ends" like Gibson.
So with the neck off the truss rod is loosened and then it's time to remove the old frets and nut.We'll need a new nut as the new frets are higher than the old ones so the nut will need to be higher to compensate for this.
With the frets heated by the soldering iron it was easy to see the amount of oil and gunk that this board had accumulated over the years. It bubbles out from the slots on some necks which means these slots are going to need to be cleaned really well before I can put the new frets in.
Sanding the board flat is easier on these than the Gibson style necks as the binding is flat with the board so you just need to be careful with the blocks.
And out come the frets ...............
The fretboard had some divots in it from string wear and I didn't want to sand too much off as the inlays are thin and the slots not very deep.
Sometimes you don't want to make the fretboard too clean and new too as it ends up just looking really out of place with the rest of the guitar.
This one cleaned up just right and was fairly straight and flat. The truss rod was fully released and there was still a "little" bit of back bow but not enough to really worry about as string tension will pull it straight or past straight and then the truss rod comes into the equation.
The new frets went in nicely and dressed up well. These were original size Fender frets but customers can option any size they want.
With the fretboard all finished and lubricated and the frets crowned and polished it was time to reassemble things and make a new nut.
The nuts on these necks have to be carefully cut in all directions as not only does the height and depth have to be perfect, the width needs to fit exactly between the piece of binding running down each side of the neck.
If it's too wide it will break the binding when you force it in. If it's too narrow there will be a gap down each side. I've repaired these where people have jammed nuts too wide in and broken the binding but my worst pet hate on these is when repairers cut through the binding to leave a slot all the way through so they can fit a "normal" nut. I HATE it when I see this.
With the nut fitted and polished it's time to cut the slots to the right height to suit the new frets.
This is done with nut files that come in several different sizes that match most of the common string gauges. If you're thinking of doing this for anything from a hobby to professional, these files are a must as they save time, money and knuckles.
This is a bone nut as I prefer them to any other material to work with and for tone.
The customer wanted the original Jag/JM bridge fitted rather than the Mustang one that had been put on.These bridge work GREAT when set up right. It's a little harder to get them right on the shorter scale Jag than the JM but they still work well when done properly. I was also in luck as this customer was asking for 12-54 strings which makes life a little easier on these shorter scales to get good tension in the stings and therefor over the bridge.
We were also fitting the mute system and the bridge cover which makes them look great although I'm not a huge fan of either for playability and practicality.
So with everything back together and set up it was crunch time ......................
This Jaguar is beautiful to look at and play. It has nice wear in great places and sounds great. Some Jags fall a little flat in the tone department but this one is very nice. Lots of sustain for a Jag too.
Back into it's original Australian hard case and back to the owner for many more years of making great music.
More offset fun .........
J Mascis Squier
Jazzmaster Custom
Jazzmaster pick ups
Jazzmaster vintage
Jaguar with Novak pick ups
Jaguar vintage
Jaguar dots and binding
Jaguar vintage
Plenty more on the blog. Enjoy.


