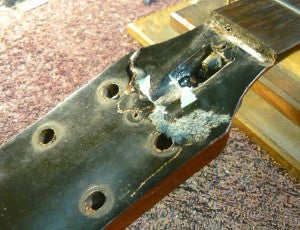
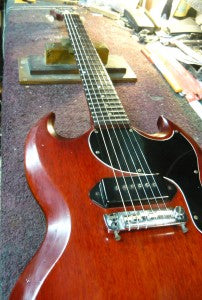
No matter how many times I see this, which is a lot, it still makes me a little sad. This is a genuine '64 SG Jr, one of the greatest model of guitar ever made in my opinion. The mahogany from this era Gibson is something else. Everyone who knows me knows how much I LOVE P-90's AND wraparound bridges. Well, this model has it all.
This is a common sight at guitar repairers (if you check my repairs blog you'll see a bunch of them) so it's not so much of a shock, just a little sad.
Like with any repair the first thing to do is evaluate the break and see if there's any issues that might hinder a good repair. This one was relatively straight forward as headstock breaks go.
There we a couple of little bits missing, but the owner had included some pieces that had come off which was great. It always helps to get those little pieces in any repair. Even if they can't be used, it sometimes gives an ideas of how it came apart, which helps put it back together.
I had a bag of bits and a headstock that "almost" went back on nicely. The owner was happy to spend a little more to make this "nice" as it's a wonderful piece of guitar and deserved to be treated well. He traveled some distance to get me to do the job,which was nice.
With the bigger piece back in the front of the headstock first it was time to do a dummy run and clamp it all up without glue. Everything fitted nicely so it was time to get this old boy back together. I didn't use my jig on this one and I used an epoxy because I had good surface area and nice contact and alignment. This is one of the points where the number of headstocks you've glued back on helps evaluate which way to go.
I leave my headstock repairs for as long as I can just to let everything set nicely. Most people say that 24 hours is all that's needed but I like to just "leave it" and move on with other work and come back to it a week later. Just something I do when the customers time restraints permits.
This one didn't look too bad straight out of the clamps which is always nice to see.
It's time to clean it up and see how the repair went both physically and aesthetically. Once all the excess glue is removed you can generally tell how it all went. At this stage I grab the headstock and try and break it back off ......... Yeah, I know what you're saying, but I figure if it snaps back off easily it was never going to hold so why go through the whole process of refinishing just to have it break off when you put strings back on it. Call me crazy !!
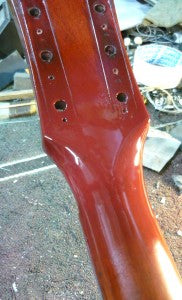
The face of the headstock had sustained a bit of damage and was going to need some serious work. The back of the neck came together well and needed a "little" filling but looked good before a finish was applied which is good.
Because of the age and type of guitar it is more than worth spending a little more time on the aesthetics to get it right. Some headstock repairs you can "hide" almost to the point of not knowing it happened. Most are done to make the guitar playable again and then it's the customers choice as to weather they want the break made to look nice or just leave it noticeable and play it.
After a couple of coats of clear to help seal and fill slightly I mixed up a colour close to the original non faded colour to cover the break. If the break didn't need filling and was "clean" I would have used a more see through finish to just bring it back to the right colour but I needed to cover the break a little more as it still looked a little "ugly"
This is straight out of the gun with no clear yet but you can see the repair is starting to look much better now.
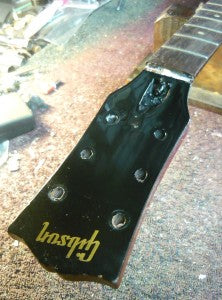
The face of the headstock was sealed and treated to a couple of coats of black. It was messy and need a bit more to-ing and fro-ing to get it looking respectable.
You've got to be careful not to damage the Gibson logo on these as they are just waterslide decals and can just "come off" if you rub them the wrong way.
With the headstock looking good it was time to let it all dry properly and move onto other work. I'll come back to this in a week or so.
So, with the repair done and the finish dry it's time to "relic" it a little otherwise the repair stands out like ........ well, you know. The new laquer is too shinny and clean so with a little "love" it's made to look a little bit old and fit in better with the rest of the guitar. This is not to hide the repair, just make the customer more comfortable with it.
Both the front and back are treated with this and then it's time to put it back together. The parts were all good and usable although the original truss rod cover broke which I will fix and put back on.
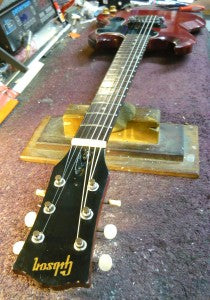
With the nut back on and the tuners fitted it was time to string it up and see how it sounds. Of course I didn't get to play it before it came in, but I have owned and played a bunch of these so I know what they're supposed to behave like.
Yep, there it is ......... It plays and sounds like a mid 60's SG Jr. These things just rattle you with the body sustain they have. The whole guitar body just shakes and that P-90 .......... Mmmmmm, P-90's !!! What a GREAT design and execution of a guitar. This really is all you need to make great R'n'R.
Personally I'd get rid of the Baddass bridge in favour of a lightweight compensated tailpiece, but that' just me. The rest is .......... GOD.
Back home to make more magic soon.


