
Anyone who frequents my blogs knows I make and rewind pickups but this one was kinda special, in that I haven't made an air coil before although I have wanted to for many years so this job just made me get my stuff sorted so I can go down another rabbit hole, which, is exactly what I need right....
As I've mentioned before I don't rewind "common" pickups that there are options for getting aftermarket versions cheaper and easier then rewinding them. This includes most Fender and Gibson pickups although I did just repair an original 1968 Patent Number "PAF" from a Les Paul Custom because, well, that's what I consider "special" in the "common" world.
I tend to take on pickups that need repair or rewinding that there aren't drop in replacements for. Something that would need modification to the guitar to fit new pickups or not look right. I don't really care if they're "worth" working on in terms of value of the guitar, as long as the customer is aware of the need to keep the guitar original. To this end I tend to rewind/repair a lot of vintage Japanese pickups which is something I hold dear. My blog is FULL of vintage Japanese rewinds if you're interested.

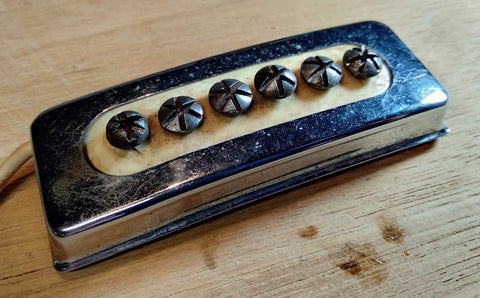
Less common (for me) is old European pickups which I don't see a lot of in guitar and/or parts repairs here. When the owner contacted me asking if I could rewind an old Hoyer floating scratchplate pickup off an old Framus guitar my inner nerd was interested. I asked for some pics and after seeing what a beautiful piece of design and engineering it was I decided I would at least take a look.

Once I got inside the pickup I knew I was in for some fun.
While I've known and seen many air coils over the years I've never actually repaired or rewound one but I have wanted to ever since discovering Semie made a lot of his 70's Mosrite pickups with these coils, and, in typical Semie fashion, they sound exactly like Mosrite pickups. But my interest was piqued.


The air coil was common in European pickups in the 50's and 60's with most German manufacturers using this technology. I'm not sure whether this was a common method in Europe or the US pickups were just more influenced by early Rickenbacker (George Beauchamp and Adolph) from the early 30's or Bigsby/Carvin/Gibson/Fender designs, none of which used an air coil but a coil of wire wrapped dirrectly onto a bobbin and/or magnets.

So, what's the difference? The air coil is essentially the same technology as other magnetic pickups in that it uses Faraday's law which states that a varying magnetic field will induce an electrical current into a conductor passing through its field. So both types of pickups use the same idea but the air coil is wound without a bobbin and structure. In other words it is a coil of copper wire free standing from the pickup assembly. You can see clearly the open coil of wire in this early 70's Mosrite pickup.

Now, while both types of pickups use a coil of copper wire with magnets to generate a small electrical charge, the air coil technically has some differences as far as physics and electrical design is concerned. The inductance is "different" as the core or bobbin is not attached, or anywhere near the coil. They also have differences in areas where using as something as primitive as a guitar pickup won't affect us at all. So, what's the point?
Well, it would appear Europe was well established at making air coils for other industries when pickup manufacturing came along and where set up to do so, it's a very easy and efficient way of making copper wire coils. If however you are not set up to wind air coils it's somewhat more difficult and confusing as wrapping wire around a solid form 10 thousand times is pretty easy.

Because I wanted to make some air coil pickups anyway I thought I'd just jump in the deep end and make myself a "reusable metal bobbin" that un-assembles after the coil is wound so I can make some 70's style Mosrite pickups as well.
The concept wasn't hard. The design was simple. The idea was basic.


The first attempt worked but was under the desired output as I was winding the coil solely on size and guessing the number of winds. These air coils are much "looser" than bobbin coils and it's hard to gauge a size due to the coil being "squashed and taped" after winding.
The second attempt was ... perfect.

Air coils are normally wound with bondable wire which you "wet" with alcohol or lacquer as you wind and then leave to set. I didn't have any bondable wire and thought I should be able to use standard pickup wire if I'm careful?
I set the posts at the right distance and machined up 2 metal sleeves to give me the desired width of the coil. I put washers on each side to give me a stable edge to wind to and then I put a piece of black pickup tape inside out wrapped around these posts and sleeves to form a primitive "bobbin"

With the tape inside out the sticky side is facing the wire and after winding (in this case 4000 turns of #44) the coil I "tied" the coil together along each length with thin tape curling the black pickup tape around the coil and effectively taping it together, inside out. The original Hoyer coil had very fine string tied at intervals around the coil to do something similar and then wrapped in this tape.
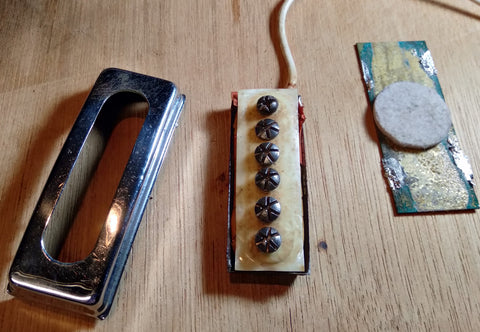
Once the coil was taped I un-assembled the "bobbin form" and the coil was free. I then just wrapped it in the thin tape like the original and then sealed it with clear enamel.

Reassembly was a simple reversal of removal with the coil sitting free in the cover, the 5 small slug magnets placed between each pole piece (north up) and then the cover put on and the base resoldered back on.


All in all this was a fun project and has started me on another obsession which, as you all know, I need more of. It also means I can repair/rewind other vintage German pickups if need be now I'm set up to do so. As I've said before, I have such a great job where I can do something I love for nearly 30 years and still come across new ways to stimulate my brain.
